This article summarizes the installation of the Bluetooth Manager plugin for Volumio3, aligned with the official Volumio3 release.
 |
| Volumio3 Bluetooth Plugin |
Improvements in the Volumio3 Bluetooth Manager Plugin
Volumio2 Bluetooth Manager Plugin for Volumio3, the following improvements were made.
- Improved device name display when selecting Bluetooth Devices
- Volumio GUI volume reflection (SoftwareVolume)
- Partial improvements to AVRCP support
Regarding the first item, in the Volumio2 plugin, a large amount of non-device-name information such as "TxPower is nil" was sometimes displayed as Bluetooth Devices, so it was changed to display only device names.
Regarding the second item, in the Volumio2 plugin, audio was always output at 100% volume to the Bluetooth receiver regardless of the GUI volume value, so volume had to be adjusted on the Bluetooth receiver side. In the Volumio3 plugin, the GUI volume value is reflected. However, since it functions as SoftwareVolume, full 16bit output is only achieved when the GUI volume is at 100%, and precision degrades as the volume is reduced. Also note that it does not link with the Bluetooth receiver's volume control, so the Bluetooth receiver's volume operates additionally on top of the volume set on the GUI side.
Regarding the third item, AVRCP (button operations from the Bluetooth receiver), depending on the types of buttons on the device, it supports play/pause/track skip forward and backward, similar to the Volumio2 plugin. However, since some devices could pause but not resume playback, it was modified to toggle between play/pause according to Volumio's playback state.
Installation Procedure
Introduction
Volumio2 Bluetooth Manager Plugin, the Bluetooth plugin installation process includes parts that forcibly introduce a build environment, so it is strongly recommended to install from a fresh image for the target Volumio3. Even if the existing environment stops working during the plugin installation process, I cannot provide environment-specific solutions. When installing on an environment that is not a clean image, please make backup measures such as cloning the entire current environment to another microSD before attempting the installation.
The verified Volumio3 version is VERSION 3.165. (Right-click and save as)
It can be used with the Volumio Free Plan.
The verified hardware is Raspberry Pi 3 Model B+ and Raspberry Pi 4 Model B.
Downloading Plugin-Related Files
Download the following four Bluetooth plugin-related files.
Please note that the files for the previous Volumio2 plugin and the files for the Volumio3 plugin have different contents.
Writing the Image to microSD
Various tools can be used to write the Volumio3 image to a microSD, but here we describe the method using Raspberry Pi Imager. Select "Use Custom" at the bottom of the CHOOSE OS section, extract the img file from the Volumio3 img.zip archive, specify the img file, and write it to the target microSD card.
 |
| Raspberry Pi Imager Writing a Custom Image |
Enabling SSH
After Volumio3 starts up and you complete the initial setup (language settings, WiFi settings, etc.) from the local http://volumio, access http://volumio/dev/ to enable SSH.
 |
| Enabling SSH |
Uploading and Extracting UI Files
Next, upload the UI files (www.zip, www3.zip, www4.zip) to the Volumio3 side. These www.zip, www3.zip, and www4.zip files are for customizing the UI to enable the installation and operation of Bluetooth Manager.
First, an SSH client is needed on the local PC to connect to Volumio3 via SSH. Here, Git Bash is used, so install it if you don't have a terminal application with SSH capability in your PC environment.
After launching the terminal, first transfer the files using the scp command, then log in to Volumio3 via SSH. For reference, the default password for Volumio3 user is "volumio".
$ scp www.zip www3.zip www4.zip volumio@volumio:~/
The authenticity of host 'volumio (192.168.xx.xx)' can't be established.
ECDSA key fingerprint is SHA256:--------------------------------------------
Are you sure you want to continue connecting (yes/no/[fingerprint])? yes
Warning: Permanently added 'volumio,192.168.xx.xx' (ECDSA) to the list of known hosts.
volumio@volumio's password:
www.zip                                       100% 4606KB   1.9MB/s   00:02
www3.zip                                      100% 7082KB   2.8MB/s   00:02
www4.zip                                      100% 7043KB   2.5MB/s   00:02
$ ssh volumio@volumio
volumio@volumio's password:
From here on, the commands are to be executed after logging in as user volumio via SSH.
volumio@volumio:~$ cd /volumio/http
volumio@volumio:~$ sudo mv www www_bak
volumio@volumio:~$ sudo mv www3 www3_bak
volumio@volumio:~$ sudo mv www4 www4_bak
volumio@volumio:~$ mkdir www && cd www
volumio@volumio:~$ miniunzip ~/www.zip
volumio@volumio:~$ cd ..
volumio@volumio:~$ mkdir www3 && cd www3
volumio@volumio:~$ miniunzip ~/www3.zip
volumio@volumio:~$ cd ..
volumio@volumio:~$ mkdir www4 && cd www4
volumio@volumio:~$ miniunzip ~/www4.zip
Changing the UI
In the default state of Volumio3, the Contemporary-type Web UI is the default, but to install the Bluetooth Manager plugin, you need to temporarily switch back to the Classic-type UI.
Go to Settings → Appearance → select "Classic" from User Interface Layout Design at the bottom and save.
 |
| Changing UI to Classic (Before) |
The UI type will then be changed as shown below.
 |
| Changing UI to Classic (After) |
Installing the Plugin
Next, click the gear icon in the upper right → click Plugins, and there should be a "Plugin Upload" tab. Drag and drop the bluetooth_controller.zip that you downloaded earlier here, and the installation will begin.
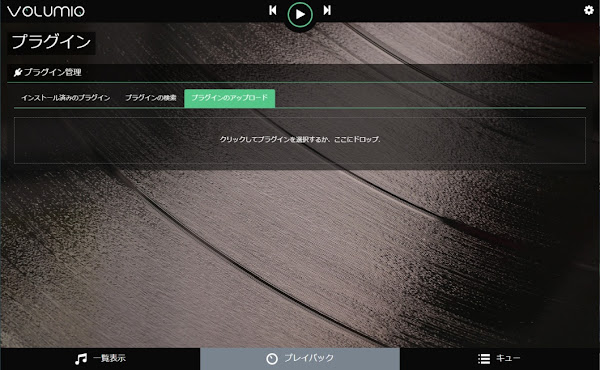 |
| The "Plugin Upload" Tab |
 |
| Immediately After Starting Plugin Installation |
The installation progress will jump to 70% immediately after starting and remain there for a while, but please wait as the installation takes a considerable amount of time. The installation completes in approximately 30 minutes on Raspberry Pi 3 Model B+ and Raspberry Pi 4 Model B, after which the following screen appears.
 |
| Installation Complete State |
Press the Enable Plugin button twice here. The installation screen in front will disappear, and the view will switch to the "Installed Plugins" tab where you can confirm that the Bluetooth Manager plugin has been installed. However, the plugin status is still "Inactive" at this point.
 |
| State Immediately After Bluetooth Manager Installation (Inactive) |
Reboot Volumio3 here. Switch the UI menu back to Contemporary and then press Restart to reboot.
 |
| Volumio3 Reboot |
Confirming Normal Plugin Startup
From this point on, any of the Classic / Contemporary / Manifest UI types can be used for Volumio3. For convenience, the screen examples here will proceed with the Contemporary type.
http://volumio, click the left menu → Plugins, and this time the Bluetooth Manager plugin should be displayed in an active state on the "Installed Plugins" tab.
 |
| Confirming Bluetooth Manager is Active |
Selecting a Bluetooth Device
Next, put the Bluetooth receiver you want to connect to into pairing mode and start it up.
In that state, click the left menu → Plugins → Installed Plugins → Bluetooth Manager → Settings. When the name of the device you want to connect to appears in the list under Bluetooth Devices, click Connect to the right of it.
 |
| Bluetooth Device Display |
After clicking Connect, press the Refresh button below several times. When the Connect label to the right of the desired device changes to Disconnect, the connection is successful.
 |
| Successfully Connected State |
Operation Verification
Once you have completed the above, simply play an audio track as usual and audio should be output from the Bluetooth receiver device. Please verify that the GUI volume controls are reflected in the audio volume. If AVRCP button operations stop working, disconnecting the Bluetooth receiver device and then reconnecting should restore button operation functionality.
This concludes the explanation of the Volumio3 Bluetooth Manager plugin installation procedure.


This comment has been removed by the author.
ReplyDeleteRaspberry Pi Zero 2Wで試してみましたが、うまくいきました。ただ、最新のVer 3ではダメで、Ver 3.165なら大丈夫でした。
ReplyDelete